
13 The Trombone
The trombone’s origin is in the medieval sackbut, which developed from the trumpet. The instruments differ in some construction details, but in essence, the practice of the trombone has remained unchanged. The trombone is unique in its use of a slide for pitch manipulation, making it the only standard wind instrument with a fully continuous range at the microtonal level. Originally, the sackbut and later trombone was viewed as a religious instrument due to its ability to perform chromatically as a double to voice parts in SATB settings.
The standard school trombone today is the tenor trombone, but several variations exist. The bass trombone is a relatively common instrument in jazz and concert bands, and the alto and contra-bass trombone can be found in some orchestral and solo literature. Many tenor trombones and all bass trombones will have a trigger on them, located near the player’s left shoulder, which drops the instrument’s pitch by a perfect fourth to allow for alternate slide positions and full chromaticism through the instrument’s fundamental. The valve trombone is another variant, which replaces the slide with valves. This instrument is most commonly used to allow euphonium players the opportunity to play in jazz ensembles which require the brighter, directional timbre of the trombone.
Characteristics of Beginning Trombonists
It should be noted that the best instrument for a student is the instrument that the student wants to play. This is no different for the trombone. With very few exceptions, any student can be an effective trombonist. With that said, there are characteristics that make for a stronger beginning trombone player.
Outstanding aural skills are critical for a trombonist. Due to the trombone slide, the trombone is capable of continuous pitch, requiring the player to listen carefully for intervals and their fellow musicians. While pitches have fixed slide positions, these slide positions vary based on partials and environmental conditions. The trombonist is constantly adjusting their pitch to ensure that it is centered in tune. Students who cannot orally match pitch frequently find difficulty in playing trombone.
Student size is a critical consideration for the trombone. Due to the length of the slide, students need to have long enough arms to reach the outer positions. For the student who is small, there are grip extenders which can be added to the trombone to allow for reaching outer positions, but these are less than ideal as they change the way the instrument is handled, making it less ergonomic. Especially when starting younger students, family height can be a consideration to identify if the student is likely to grow into the instrument. It is not uncommon for beginning trombonists not to be able to reach the outer positions.
The embouchure for the trombone is fairly forgiving, making the trombone a possible instrument for students with braces or other orthodontic issues.
Setting Up the Trombone
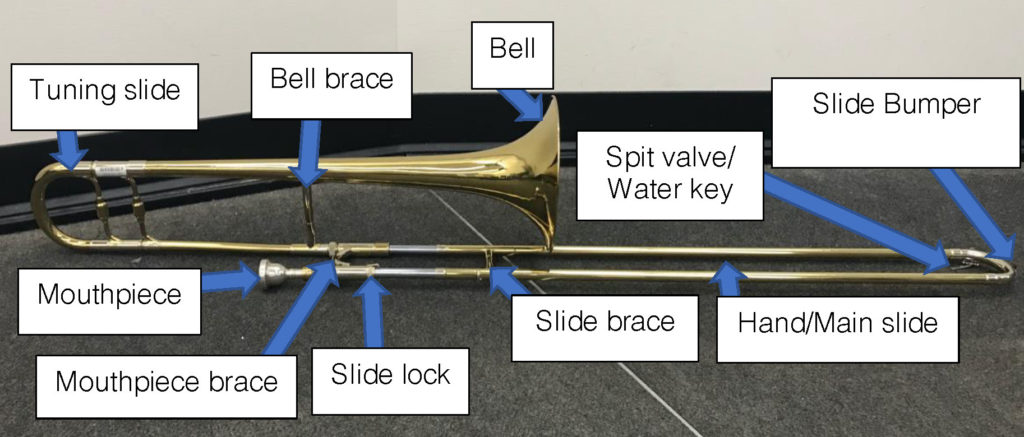
The trombone is the only brass instrument requiring assembly for playing. Of greatest importance is making sure that the slide is always carefully handled, as even small dents can make it unusable and difficult to repair. When not in use, the slide lock beneath the mouthpiece should always be locked.
The slide of the trombone should be held in the right hand at the slide brace. For beginning players, encourage them to hold the slide vertically with the rubber stopper on the bottom of the slide resting on the floor.
With the left hand, place the bell section onto the receiver that is on the longer side of the slide. The bell should go on smoothly; if force is needed to get it on, lubrication may be needed. A graphite pencil can be scribbled on the inner tubing to provide light lubrication. The angle between the slide and bell should be slightly less than 90 degrees. The bell lock should be screwed down to finger tightness. No tools should ever be used to tighten a trombone bell lock.
The left hand supports all the weight of the trombone. An “L” should be made with the thumb and first finger. The thumb should wrap under the bell tubing above the bell brace. The index finger should rest across the mouthpiece brace, pointing toward the mouthpiece. The other three fingers should wrap around the tubing between the mouthpiece and slide braces.
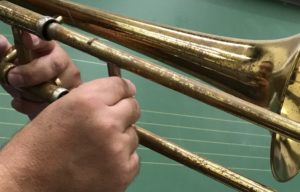
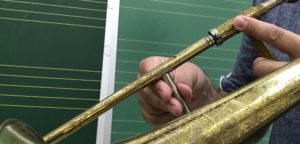
The right hand controls the movement of the slide. The slide should be positioned between the tips of the thumb and index and middle fingers. The other fingers should not make contact with the instrument, but rather should curl gently into the palm of the hand
After proper posture is set (see the Posture chapter), the trombone should be brought to the embouchure. Arms should remain in a relaxed position away from the rib cage to allow for unrestrained breathing.
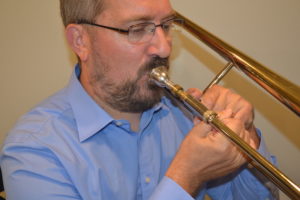
The embouchure for the trombone varies extensively across players. Ideally, the mouthpiece should be positioned in the middle of the embouchure from left to right with roughly a 50/50 division between the upper and lower lips. Many professional players also use two-thirds, one-third division between top and bottom lip. The best embouchure is the one which produces the fullest tone for the student.
Trombone-specific details and concepts
As mentioned in the previous chapters, many of the details of trombone playing are common to all brass playing concerning technique, tone, and practice. Make sure to reference the general sections regarding each of these issues in addition to the trumpet specific details below.
Range development
As with all brass instrument, range development tends to be slow compared to woodwind and string instruments. Because there is muscle development required to move between shelves, beginning trombone players often have very limited ranges of around an octave. It is critical that students are not rushed to play higher notes than they can control without pressure and with good air control. Long tones and interval studies are critically important for beginning trombone players, so that they build the muscle tone and control to be able to play in higher registers.

Follow this link for a Trombone Fingering Chart.
The slide
The slide is the obvious unique characteristic for the trombone, allowing it to play every beginning trombonist’s favorite glissando. The slide also creates some challenges for beginning trombonists, namely that there is no easy way to guarantee that they are close to the correct pitch. The slide makes it critical that trombonists have strong aural skills.
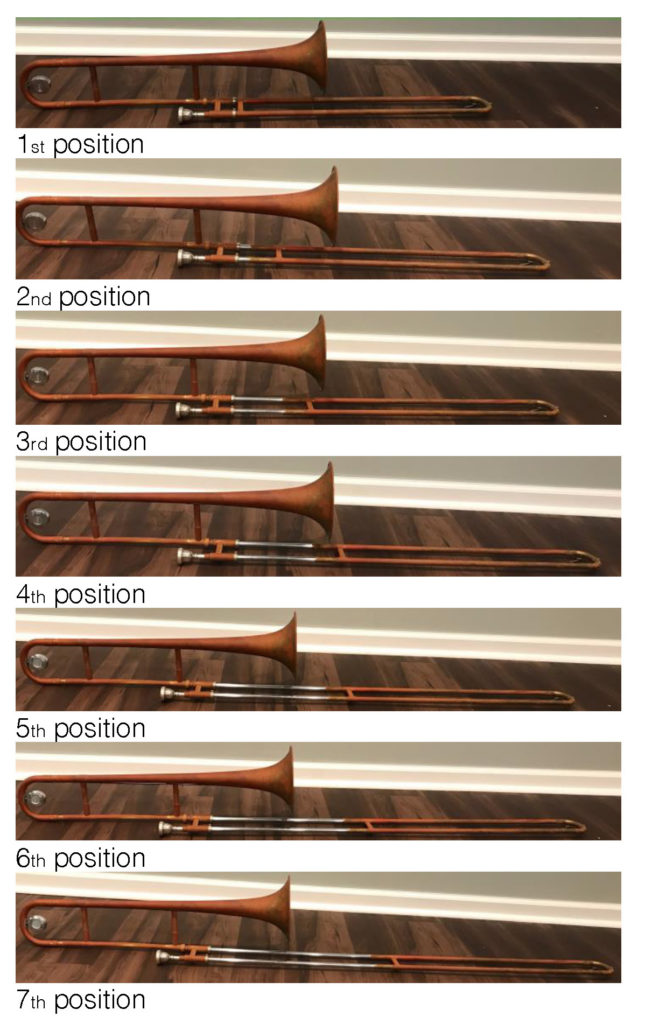
The slide is divided into seven positions, each of which is a half step apart. The distance between positions gradually increases from 3″ for 1st to 2nd position to just over 4″ for 6th to 7th position. Due to the different intonation tendencies of each partial, the position for each position is not identically the same across the range of the instrument. Students should learn their slide positions through a combination of muscle memory and careful listening. Discourage students from using their fingers to feel for the bell to place 3rd and 4th position, as this creates strain in the wrist and a false sense of confidence.
The wrist leads the movement for the slide. The first two fingers and the thumb should be able to rotate around the slide brace as the wrist makes small adjustments. The wrist should stay loose and pliable, so that small adjustments can be made. The larger the movement of the slide is, the more involvement is introduced from elbow. Very little movement should occur from the shoulder, which should be limited to 6th and 7th positions.
Very importantly, slide movement should always be quick to limit the amount of slide movement between notes to avoid glissandos.
F-attachment
More advanced trombones will often have what is termed an F-attachment. The F-attachment is an alternative bell segment that adds additional tubing to the instrument to lower the pitch by a perfect 4th when the rotor is engaged. The F-attachment serve two critical purposes:
- eliminates the need for large slide movements as alternate slide positions can be used for outer positions
- gives the trombone the pitches from b1-eb2 that allow for full chromaticism through the fundamental bb1.
The F-attachment can serve as an alternative also for particularly small trombonists, though this does add additional weight to the instrument which they will need to contend.
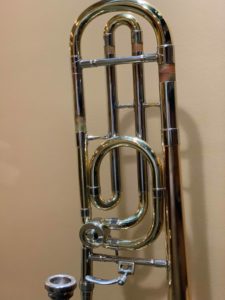
When looking at bass trombones, it is common to have a double rotor system. The first rotor drops the instrument into F. The second rotor, in combination with the first, drops the instrument into Eb or D, functionally extending the lower octave of the instrument and providing more alternative positions to allow the larger slide to stay in the close positions. The construction of this second rotor can vary. In instruments with dependent (or stacked) rotors, the second rotor is built into the tubing for the F rotor, so the second rotor only functions with the first attachment opened. In independent (or in-line) rotor instruments, the second rotor is built into the main tubing, allowing it to function without the F attachment. For independent instruments, the second rotor drops the instrument into G or Gb when used on its own.
Slur or legato tonguing
The slide presents a problem for trombonists when they play parts that require slurring. Since the slide needs to move between notes, there is no way to have an unarticulated notes without a glissando between them. To remedy this, trombone players use a “lah” syllable to very lightly divide notes. The tongue merely interrupts the air flow as lightly as possible while the slide moves as quickly as possible.
Intonation
Unlike other brass instruments, intonation on the trombone is primarily controlled mechanically. Since the slide is continuous in pitch, the trombone player adjusts the slide to address pitch inconsistencies. This allows the embouchure to remain centered, allowing for consistent tone control. This also means that slide positions vary slightly based upon the intonation tendencies of different partials.
Mutes
The trombone utilizes the same collection of mutes as the trumpet.
Standard Mutes
Straight mute-This is the most common mute for trombone players. If a part calls for “with mute” or “con sordino,” a straight mute is typically being expected. Similar to trumpet, they come in a variety of different materials, each possessing slightly different timbral qualities. In general, the mute cancels lower overtones making for a bright, brassy tone with reduced dynamic.
Cup mute-The cup mute looks like a straight mute with a bowl attached to its base and comes in both fiber board and metal. The cup mute muffles the tone of the trombone by redirecting the upper overtones back into the instrument.
Specialty Mutes
Wah-wah or Harmon mute-The wah-wah mute is a fixture of certain jazz styles, comprised of a bulb shape with a small hole in its base, which can be expanded with a stem. The cork completely seals the bell, so all air must pass through the hole in the mute’s base. When the stem is out, the tone is very mellow with greatly reduced volume. When the stem is in, the tone is very direct and buzzy. By placing the hand or a plunger over the stem opening, the characteristic “wah-wah” sound can be made, which bends both pitch and tone. This must makes instruments extremely sharp, so the tuning slide should be adjusted when using the wah-wah mute. The wah-wah mute with stem in creates the famous “Charlie Brown’s teacher” effect.
Plunger mute-The plunger for trombone is a standard toilet plunger. There is a bit of challenge for trombonists in using the plunger, as it is held by the left hand. The bell rests against the wrist, which serves as a hinge to open and close the bell. When using the plunger, the left hand is simultaneously manipulating the plunger and supporting the weight of the instrument. This posture can easily lead students to put more pressure on the embouchure, so care should be made to ensure that excessive pressure is not put on it.
Bucket mute-The bucket mute is a bowl or bucket with three springs on the rim that attach over the trombone bell. The bowl is full of batting to soften the tone and dynamic of the trombone.
Practice mute-Practice mutes look like straight mutes stuffed with batting. They are designed for quiet indoor practice. Caution should be used with practice mutes as they add a great deal of back pressure that can cause harm and develop bad habits.
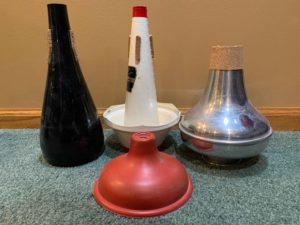
Front row: Plunger mute
Back row: Straight mute, Cup mute, Wah-wah mute
Unique Issues for Trombone
Fist grip-Beginning trombone players will often wrap their entire hand around the slide brace, making the wrist rigid and losing the ability to pivot around the grip. Remind students to hold the slide brace between the finger tips of the first and second fingers and the thumb. Practice moving between 1st and 2nd position using only the wrist, allowing the slide brace to pivot between fingers when doing that motion.
Glissandos between notes-If students are using slow slide motions, glissandos will be heard between notes, even when students articulate appropriately. Students should be reminded to move the slide quickly between positions. Intervals studies like Broken Remington can be particularly useful in isolating this movement. Start with close movements between notes that are a second apart and then progress to larger intervals.
Collapsed posture-Due to the off centered posture of the trombone, it is common for trombonists to slump to the left, either by tilting the torso or allowing the neck to tilt. At times, beginning trombonists may try to rest trombone bell segment on their shoulder to lessen the weight on the left hand. This collapsed posture inhibits air flow and creates issues for quick, smooth slide movement. Students should lift the trombone off of their shoulder and make sure that the back remains straight and head remains elevated by always setting posture first and then introducing the instrument to the established posture.
