
15 The Tuba
The tuba is the modern representative of a long history of brass instruments that have attempted to serve as the bass voice of the ensemble. Some of these instruments, such as the ophicleide and the serpent, took their design from bassoons and other bass woodwind instruments. Others attempted to capture the characteristics of smaller brass instruments scaled up for size, such as the bass saxhorn and Wagner tuba. This evolution can still be seen today as there is not a single standard design for the tuba, although the principles have been broadly standardized.
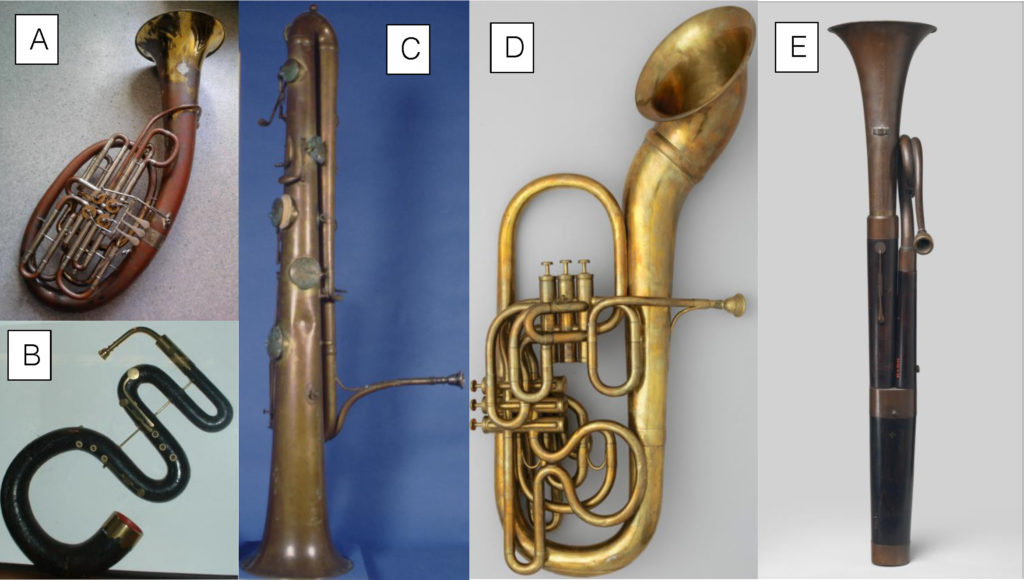
A. Wagner tuba B. Serpent C. Ophicleide D. Bass Saxhorn E. Russian bassoon
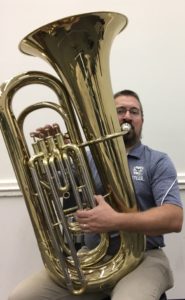
By the early 1900s, the modern tuba assumed its current form. By default, the modern tuba is a vertical projecting, conical bore instrument with at least three valves or rotors. In classrooms, it is not uncommon to still find bell front tubas, which have a 90 degree curve placed just before the bell flair. The BBb tuba is the standard tuba found in schools, while the CC tuba is typically preferred by professional players, especially in orchestras. Tubas can also be found regularly in Eb and F, which are typically used as solo and chamber instruments as they are smaller instruments allowing for greater agility. To accommodate players of different sizes, tubas also come in scaled versions, sometimes referred to as junior tubas, with many schools utilizing 1/2 or 3/4 size tubas.
Regarding construction, tubas are commonly found with valves and rotors. They can have as many as six valves, allowing for different combinations to improve intonation and extended low register. For beginners, a 3- or 4-valve BBb tuba is preferred, as it is more durable than the rotor versions and allow for the development of solid fundamentals without the confusion of extended fingerings. While tubas of a given key have the same length of tubing, different manufacturers have wound their tubas differently, which affects both timbral and handling aspects of the instrument.
Two common variants of the tuba can be found in many schools, specifically for marching band. The sousaphone wraps around the player’s body with a front facing bell. It is more cylindrical than the tuba, and has a very directional sound that is conducive for the marching field. Those timbral aspects also make it less desirable for the concert ensemble. Another alternative is the marching contra (short for “contrabass bugle”). This instrument was developed for the drum and bugle corps tradition. It is carried on the right shoulder and has timbral aspects more similar to the tuba than the sousaphone in its warmth and depth. Some schools will use a convertible version of the contra that has a moveable lead pipe that allows for shoulder carriage for marching band, and traditional seated posture for the concert setting.
Characteristics for Beginning Tuba Players
It should be noted that the best instrument for a student is the instrument that the student wants to play. This is no different for the tuba. With very few exceptions, any student can be an effective tubist. With that said, there are characteristics that make for a stronger beginning tuba player.
Lung capacity is the single most important variable for effective tuba playing. While a tuba player does not need to be physically large, they do need to develop significant lung capacity to play the tuba.
Because of the register in which the tuba plays, tuba players should be able to distinguish low pitches well. Many students are able to match pitch in their singing register well, but may struggle to be able to transfer that pitch matching to the low register that falls beyond the regular human voice.
While it may seem that player size should be a concern, there are several ways that small students can be successful on tuba without any issues. The one concern regarding size is hand spread. The valve spacing on tubas can be rather broad, and students should be able to reach all three (or four) valves simultaneously. The hand position can be uncomfortable at first, so the concern should be about whether they have the spread in the hands as opposed to whether they can comfortably do it at first.
Tuba is a frequent candidate for transferring students to from other instruments. Out of the brass instruments, euphonium players are logical candidates for tuba as there is a similar (though not identical) approach to performance on the instrument. Students should have well developed low registers on euphonium if they are to be successful on tuba. Similarly, horn can be a highly effective transfer for the student who has a strong low register and potential weak upper register (or orthodontic issues).
Surprisingly, woodwind players frequently make some of the easiest transfers to tuba. Due to similar demands for air, flute players often make strong tuba players. The student with great tone but issues with the dexterity required for flute can make for highly effective tubists. Saxophone can be another particularly strong transfer, especially for the student who at times has a woofy tone in the low register or on tenor or baritone saxophone. That woofy tone is frequently due to an oral cavity that is too large and too much air support. The characteristics that make for an unfocused saxophone tone also make for a full tuba sound.
While any student can potentially be successful on tuba, double reed, clarinet, and trumpet players often struggle in making the transfer to tuba. The embouchure required for these instruments is quite tight, and these instruments utilize less air and more back pressure. Additionally, for the reed instruments, the embouchure is rolled in, which will be a habit that will need to be quickly broken to be successful on tuba.
Setting Up the Tuba
There are many different designs for the tuba, so no one set of instructions will work for all instruments. With that said, nearly all tubas are balanced similarly and have similar characteristics regarding handling.
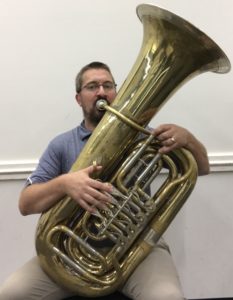
The weight of the tuba is placed upon the player’s leg, their chair, or a tuba stand, dependent on the size of the tuba and the tuba player. The left arm serves two purposes. First, it helps to balance the tuba by ensuring that it is stable on its resting surface. Second, the left hand can be used to adjust slides (often the 1st valve slide) to adjust intonation, as the size of the tuba makes intonation issues become exaggerated). For most tuba players, the tuba rests on the inside of their thighs. Shorter players may use the chair between their legs or a specially designed tuba stand to hold the tuba. Importantly, the tuba’s position should be dictated by the pre-set posture of the player with the shoulders aligned over the hips, the back straight, and the head elevated. While the size of the tuba may require slight alterations, good posture should not be compromised to accommodate the tuba.
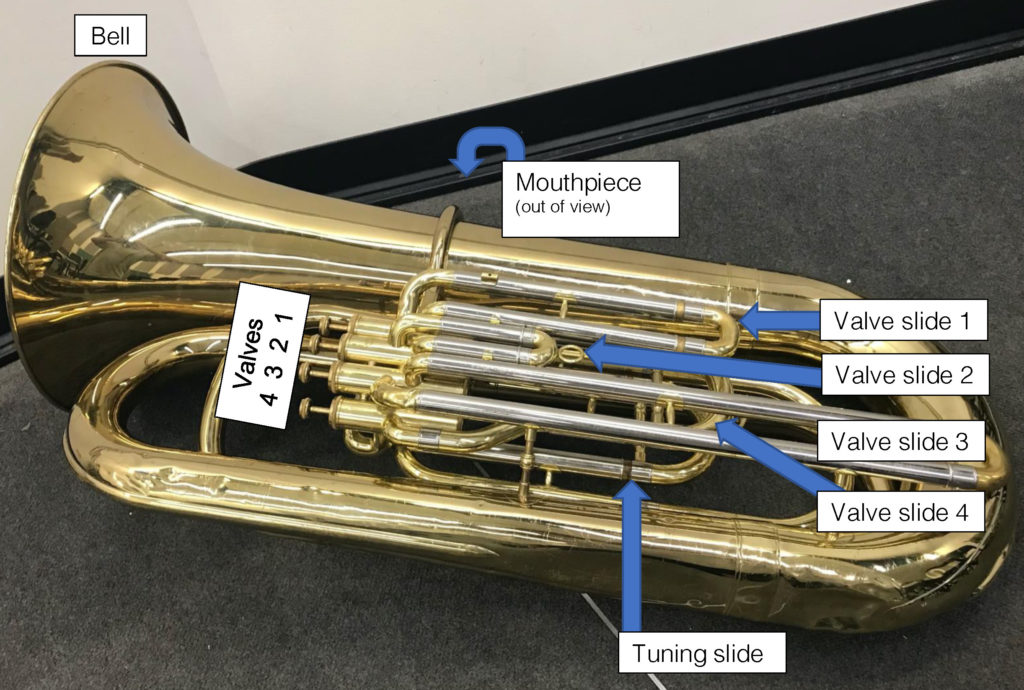
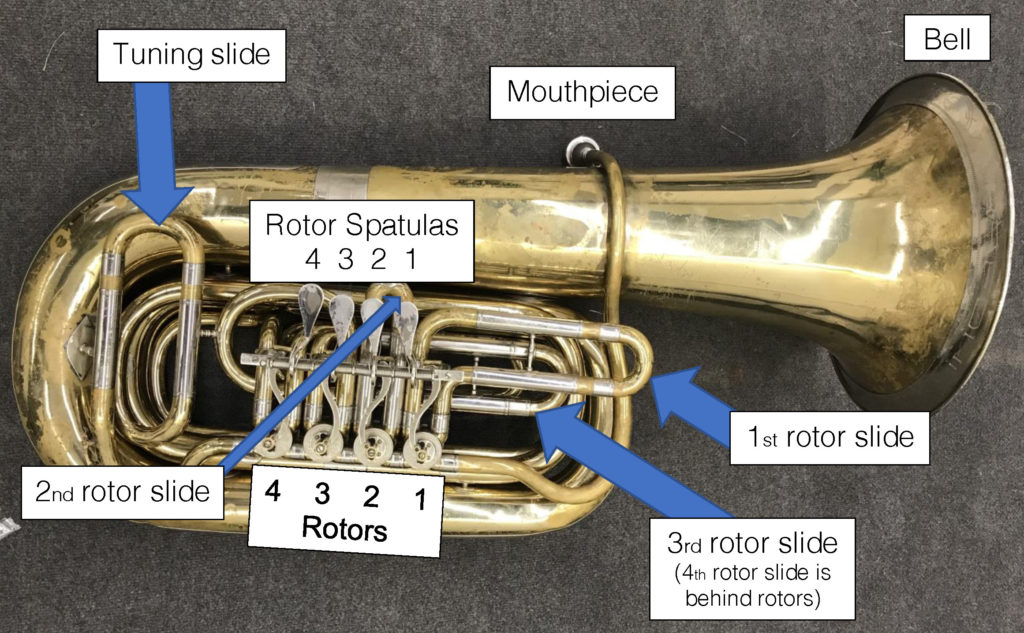
The right hand controls the valves or rotors. In some case, the valves will be vertical, as on the euphonium. In this case, the right hand is in the shape of a C, with the thumb placed against the support brace across the back of the valve. Importantly, the finger tips should rest upon the key caps of the valves. Students should not allow their fingers to float freely or curl back to the palm as they play.
For instruments that have horizontal aligned valves or rotors, the right arm will wrap around the side of the instrument. The hand should still have a relaxed position, but the fingers will be slightly flatter than they are with vertical valves. The pads of the fingers should rest on the valve keys or rotor spatulas in a way that minimizes movement when playing.
The embouchure of the tuba is extremely relaxed, with nearly no tension in the corners of the mouth. Ideally, the tuba mouthpiece should sit close to a 50/50 division between top and bottom lips, but this will be dependent on the size of the player’s face. The bottom of the mouthpiece should not sit on the chin bone, and the top of the mouthpiece should not make contact with the player’s nose.
Tuba-specific details and concepts
As mentioned in the previous chapters, many of the details of tuba playing are common to all brass playing concerning technique, tone, and practice. Make sure to reference the general sections regarding each of these issues in addition to the tuba specific details below.
Range development
As with all brass instrument, range development tends to be slow compared to woodwind and string instruments. The starting range of beginning tuba players can vary greatly. Some beginning students quickly achieve the extremely relaxed embouchure required for the low register. Others start with a range that borders on tenor voices. While early literature will emphasize the mid-low register at the bottom of the bass clef staff, variability across students will be broad. When initially developing embouchure fundamentals, emphasize a relaxed embouchure without smiling or cheek puffing to allow the entire embouchure to fully engage in vibration. If students are struggling with range development, prioritize low register tone development over middle and upper range.
For intermediate students, their range development will not necessarily develop chromatically or evenly. They should be encouraged to start developing the pedal bb0 as it will assist in the development of overall tone, intonation, and range development as they better grasp air and embouchure usage. Be aware that there is a false tone eb1 that will be fuzzier and is highly unstable.
Low end range is largely dependent on the instrument that a student has. Notes below e1 and above bb0 are only able to played on an instrument with at least 4 valves. Students on a 3-valve tuba may be able to continue this chromatic line through the use of the false eb1, but it is not advised if there is a 4-valve option.

Follow this link for a Tuba Fingering Chart.
Instrument handling
One of the initial challenges of the tuba is being able to handle it appropriately. Students need to be taught and reminded that their instrument takes up quite a bit of space, and be prepared to clear the area around them to avoid damage to the tuba or others. There is a temptation to set the instrument down on its bell, but this should be discouraged as the weight of the instrument along with the momentum of setting it down can cause the bell to buckle. Instead, it should be laid on its back with the valve slides facing up whenever possible.
When trying to identify proper playing position for the tuba, the student should start with proper posture first (see Posture). They should then bring the tuba to their body, with an emphasis on having the mouthpiece meet their embouchure without adjusting back, neck, or head angles. Having the teacher or another adult help situate the tuba can help. The tuba itself can be at a slight angle to accommodate embouchure provided that the student can balance the weight with their left arm. There are a few options for supporting the tuba.
- resting the tuba on the leg or between the thighs.
- resting the tuba on the seat of the chair between the legs. This works particularly if there is an angle that the tuba can be held at to ensure that the mouthpiece is in the right position.
- purchasing a tuba stand to support the instrument from the floor. If the student is using a tuba stand, they should sit on the front part of the chair so that the instrument is still situated against their body so that they do not need to lean forward or lean the tuba backward to comfortably reach the mouthpiece.
The general rule for all brass posture stays the same–establish proper playing posture that limits tension and maximizes air support first, and then introduce the instrument in a way to maintain that posture.
Additional valves
Many intermediate and advanced tubas include additional valves that serve to provide for more in tune alternates to 3-valve combinations and to extend the lower register of the instrument past the fundamental. For student instruments, 4-valve models are quite common and are advised. Many advanced tubists will play instruments with up to 6 valves or rotors to allow them greater pitch flexibility. While there is variation based on manufacturer, the following chart is the general rule of thumb for tubas:
| Valve | Effect on partial |
| 1 | Major 2nd down |
| 2 | minor 2nd down |
| 3 | slightly sharp minor 3rd down |
| 4 | Perfect 4th down |
| 5 | flat Major 2nd down |
| 6 | flat minor 2nd down |
On most instruments, the role of the 5th and 6th valves are to allow for in tune playing when combined with the 4th valve. They also serve to extend the range of the instrument further. By utilizing the 4-6th valves in combination with the first 3 valves, advanced tuba players can correct pitch tendencies. Again, beginners should have no more than 4 valves to start so that they can master fundamentals before focusing on intonation details.
Intonation control and additional valves
Dependent on the instrument, there are three mechanisms by which intonation is adjusted on the tuba. In the end, embouchure adjustment is always a possibility, and due to the large size of the instrument, small changes in the embouchure can have a significant impact on pitch without affecting tone provided that quality air support is always present.
Second, on tubas with additional valves or rotors, alternative fingerings can be used by more advanced players to adjust characteristically out of tune notes. Most notably, the 1-3 combination should be replaced with 4 and 1-2-3 should be replaced with 2-4 as these are characteristically quite sharp.
Additionally, due to the additional slides, each slide should be tuned to play in tune based on its relationship to the open tuning pitches (see Intonation). Each slide is designed to play slightly sharp with the expectation that the slide length will be adjusted prior to performance.
Third, many tubas are designed to allow for easy access to the valve slides. Many tuba players will adjust the 1st valve slide in particular while playing to correct particularly out of tune notes using the 1st valve, notably pitches with the 1-2 combination.
Articulation
Due to the particularly wide embouchure, the approach to articulation on tuba is slightly different than that of other brass instruments. Rather than just attack the note with the tongue at the front two teeth, the tongue flicks up to interrupt the air flow across the entire front of the mouth. Additionally, due to the large amount of air needed for the tuba, the oral cavity is nearly always completely open. Instead of using a “tah” syllable, tuba players will often use a “thoh” syllable which allows for a broader strike zone for the articulation and a lower tongue position when playing.
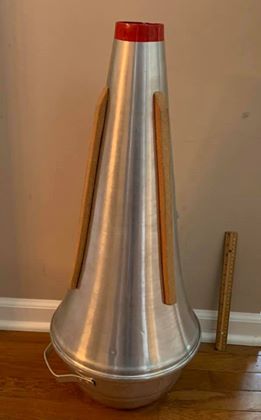
Mutes
The use of mutes on tuba is relatively uncommon, both because of the ungainly size of tuba mutes and functional impact. When called for, the straight mute is the common mute for the tuba. It typically has a handle on the side to allow for easier insertion and removal. The mute is placed in the bell when the tuba is in upright position.
Unique Issues for Tuba
Posture problems-Due to the ungainliness of the size of the tuba, many tuba players develop posture that collapses their torso, twists their bodies in unusual ways, and creates ergonomic problems that can make playing difficult and lead to long term health concerns. Make sure that students are establishing their initial posture correctly (see Posture) and then introduce the instrument to that posture.
Importantly, make sure that your students have what they need to be successful to support the instrument. They may need a different chair or a tuba stand, so that they have a wider lip to rest the instrument upon. They also need to have enough space around them to allow them to bring the instrument down safely and controlled while resting.
Weak tone-The biggest performance issue that young tuba players encounter is weak tone from a lack of air. It is important that the expectation for tone duration between breaths is different for tuba players than other instrumentalists. While high brass or woodwind students should be able to use four measure phrasing fairly quickly, tuba players may take a year or more to develop the lung capacity to sustain long phrases with good tone. They can develop bad habits of weak air support by being rushed to develop long phrasing too early.
Regular use of breathing activities is critically important for tuba players (see Breathing). Long tone work on the tuba, as opposed to the mouthpiece, can also help build this capacity. The low register of the tuba in particular uses a great deal of air, so students can do capacity building activities in the middle register where sustain is easier. Finally, students need to be taught to monitor their own air usage so to know when they need to breath and recognize the markers of weak, under supported tone.
Double buzzing-When the lips vibrate at different rates, a double buzz will be created, which manifests itself as thin tone with highly apparent overtones. This can be a sign of mouthpiece anchoring, where the mouthpiece is being pushed into one lip or the other, thereby deadening the buzz. It can also be a sign of a smile or pucker embouchure where muscles are being unevenly engaged. Remind students of the fundamentals of good embouchure positioning, emphasizing the neutral position of the lips that are not smiling, frowning, or puckering (see Embouchure). Have them then practice with only the mouthpiece, paying attention they are not anchoring the mouthpiece onto the upper or lower lips. They should also make sure they are using full air support, as weak air can cause only one lip to fully vibrate.
Cheek puffing-Because of the very relaxed embouchure, tuba players will often find their cheeks puffing or air leaking through the corners of the mouth. (Old cartoons with red cheeked tuba players in polka bands probably do not help the situation.) This can also be a sign of fatigue in playing. While the embouchure needs to be tension free for clear, full tone in the lower register, the corners of the mouth should be firm enough to keep the cheeks pulled in. By puffing the cheeks, the oral cavity is expanding, creating eddies of slow moving air.
Importantly, have students practice by a mirror so that they can become aware of what cheek puffing feels like. They will often find that their cheeks puff as they start to tire. This is a good sign that they should take a break. When playing, encourage students to think about focusing the air toward the center of the embouchure, which will firm up the cheek muscles. Practicing in the middle register where there is more presence in the embouchure will also help to develop the muscles needed to keep the embouchure focused when relaxed in the low register.
