
8 Instrument Care
If a few regular tasks are done, brass instruments require little professional maintenance, provided that dents are avoided; slides, valves, and rotors are lubricated; and the inside of the instrument is kept clean.
Mouthpiece Care
The mouthpiece is the primary point of contact with the instrument, and therefore, should be kept clean. The mouthpiece should ideally be rinsed every day and washed at least once a week with dish soap. This will keep it clean and hygienic.
Lubrication
Depending on the instrument, different oils and greases are used on brass instruments. As an brass instructor, you should have the following lubrications on hand:
- valve oil
- rotor oil
- trombone slide grease
- slide grease
Valves, rotors, and slides should be lubricated on a regular basis. Once a week is a good rule of thumb, though if rubbing or dragging are felt when playing, more lubrication should be added immediately. All valves, rotors, and slides should be lubricated immediately following a cleaning of the instrument as well.
Valves
Valves pistons on trumpets, euphoniums, and tubas should be removed from the valve casings prior to oiling with valve oil. A few drops of valve oil should be placed around the ports on the valve piston. The valve piston should be placed back in the casing and rotated until it locks in place. After the valve cap is screwed down, the valve should be pushed up and down several times to ensure that it is fully lubricated. Pay close attention to where the valve is removed from, as the valve should return to the same valve casing. Most instruments have a number etched in each valve piston to ensure that they are returned to the correct valve casing.
Rotors
Rotors on horns, F attachments on trombones, and some tubas should be lubricated with rotor oil, which is slightly thinner than valve oil. Rotors should not be removed as they can be very difficult to calibrate. If rotors need to be removed, they should be taken to a qualified repair shop. Instead, the cap on top of each rotor should be removed and two to three drops of oil should be placed on the center of the rotor. If the rotor is still sluggish, the slide can be removed for each rotor and oil can be dropped down the slide casing. The paddles should be quickly fluttered to ensure that the oil is evenly distributed around the paddle.
Trombone Slides
The trombone slide should be greased with trombone slide grease, which is thicker than valve oil but thinner than slide grease. When applying slide grease, a narrow band of grease should be placed all the way around the circumference of the slide toward the end of the inner slide, near 7th position. The slide should then be moved back and forth several times to ensure distribution of the grease. If there is any drag, the slide should be inspected for damage or dirt. If nothing is a problem, another coat of grease should be added.
Tuning and Valve/Rotor Slides
All slides except for the main trombone slide should have slide grease used on them. Slide grease is thick so it tends to stay on the slides, including those that are seldom moved. A light coating of grease should be placed around the circumference of the inner slide near the tube opening. When inserting the slide back in, the slide should be moved in and out to ensure that it receives a full coating of grease to prevent stuck slides which will require professional removal.
Cleaning Brass Instruments
Regular washing of brass instruments (once every other month) will keep instruments in top shape and will dramatically reduce the need for professional maintenance of instruments. Beginning students are fully capable of washing brass instruments by following a few simple directions. The following materials are needed:
- Instrument cleaning snake
- Valve brush
- Mouthpiece brush
- Multiple soft clothes for washing and drying (ideally 100% cotton or microfiber)
- Dish soap
- Lubricants for valves, rotors, and slides
The water for washing brass instruments should be similar in temperature to that which would be used to wash dishes. Never use boiling water, especially on lacquer instruments as the integrity of the lacquer may be affected. Similarly, a mild detergent should be used on the instruments. Liquid dish soap with a degreaser works just fine.
Each brass instrument should be completely disassembled with the exception of rotors when washing a brass instrument. Make sure to depress the valves when removing valve slides to avoid creating vacuum pressure within the valve. The body of the instrument and the slides should be placed in the warm water and be allowed to soak.
Valves should be placed in a separate container of warm water and soap which allows the felts at the top of the valve to remain dry.
Once instruments have soaked for at least 10 minutes, a cleaning snake should be pulled through all tubing. If the snake brush comes out particularly dirty, rinse, and run through the tubing again. The exterior of all parts of the instruments should be scrubbed with a soft cloth, paying particular attention to raw brass parts of slides and slide receivers and screw mounts on the valve casings where grime frequently collects. Place instrument parts back in the water after snaking and allow to soak for at least 10 more minutes.
Valve pistons should be lightly scrubbed with a soft cloth. Felts should be kept dry to ensure that they do not absorb moisture which can lead to mold. Additionally, nothing should be pushed through the valve ports to avoid damaging the passages.
When removing instruments from their water bath, make sure to run clean, warm water through all tubing to rinse out any remaining soap. Immediately dry the instrument with a soft cloth and set aside for 10-15 minutes to ensure that the instrument is completely dry before lubricating.
Follow the rules above for appropriate lubrication of instruments. Lubrication should be done before reassembling the instrument to avoid stuck slides, valves, and rotors.
If polishing of the instrument is desired after washing, make sure to use either a clean soft cloth or a polishing cloth specific for the finish of the instrument. Silver instrument polishing clothes should not be used on lacquer instruments and vice versa.
Basic Classroom Repairs
In general, brass instruments are fairly durable and should not need regular professional service if regular home maintenance is done. There are a small number of common problems that can be easily fixed at home or in the classroom.
Stuck mouthpieces
It is imperative that a brass instructor has a mouthpiece puller readily available. They come in many designs, but the concept remains the same. Set the base of the mouthpiece remover against the top of the receiver and the top of the remover is placed under the rim of the mouthpiece. A set of screws are used to pull the mouthpiece free from the instrument.
A stuck mouthpiece should not be removed using any workshop tool or by twisting and yanking on the mouthpiece. This can break the braces that hold the instrument together or spiral the lead pipe. Never use pliers to remove a stuck mouthpiece!
To prevent stuck mouthpieces, when placing the mouthpiece in the mouthpiece receiver, give it a quarter twist. This twist will make a stuck mouthpiece come out more easily with gentle twisting from the hand.
When mouthpieces are dropped, they can often become dented along their shaft. By using a mouthpiece trueing tool, dents can be removed to return the base of the shank to round. The trueing tool should be inserted into the base of the mouthpiece and gently rotated while applying gentle pressure toward the cup. Care should be made to work slowly, so regularly check the shape of the mouthpiece shank. If correction is done too far, the shank can become flared and will damage the mouthpiece receiver.
Broken rotor strings
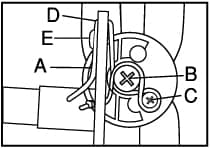 Rotor strings break regularly. Using a nylon or multi strand cord, students should learn to restring their own horn.
- Tie a knot in the cord and thread it through the hole without a screw at the base of the rotor paddle.
- Make a figure 8 around screws B & C. The cord should go clockwise around screw B and counterclockwise around screw C.
- Thread the cord through hole D.
- Tighten screw C after checking that the rotor paddle is even with the other two paddles.
- Wrap the cord around screw E and tighten the screw to hold the cord in place.
Stuck valve caps
Valve caps frequently become frozen. They can be loosened by tapping on them lightly with a rawhide hammer. Be careful not to strike the valve casings themselves. Then, twist the caps with your fingers.
Stuck slides
Before trying to remove a slide, inspect the instrument to make sure there are not any dents or other damage done to the slide. If no damage is visible, liberally grease any exposed slide and apply firm pressure to see if the slide can be pushed back in. If it still does not move, thread a polishing cloth through the slide and give a firm tug.
If there is damage or the slide does not move after trying the steps above once each, send the instrument to a qualified shop for repair.
Stuck valves
Before trying to remove a valve, check the valve casings for damage or dents. Provided that the valve is stuck up, drip valve oil through the bottom cap. Then, take a small raw hide hammer and gently tap the valve button. Make sure to tap straight down. Once the valve moves, add more oil until the valve can be removed. Re-oil and insert into the instrument.
If there is damage or the valve does not move after a small number of gentle taps, send the instrument to a shop.
Repairs that Require Professional Service
- Dents
- Bent tubing
- Stuck rotors
- Stuck slides or valves that do not move easily
- Misaligned slide posts
