2 Getting Started with Posture, Breathing, and Embouchure
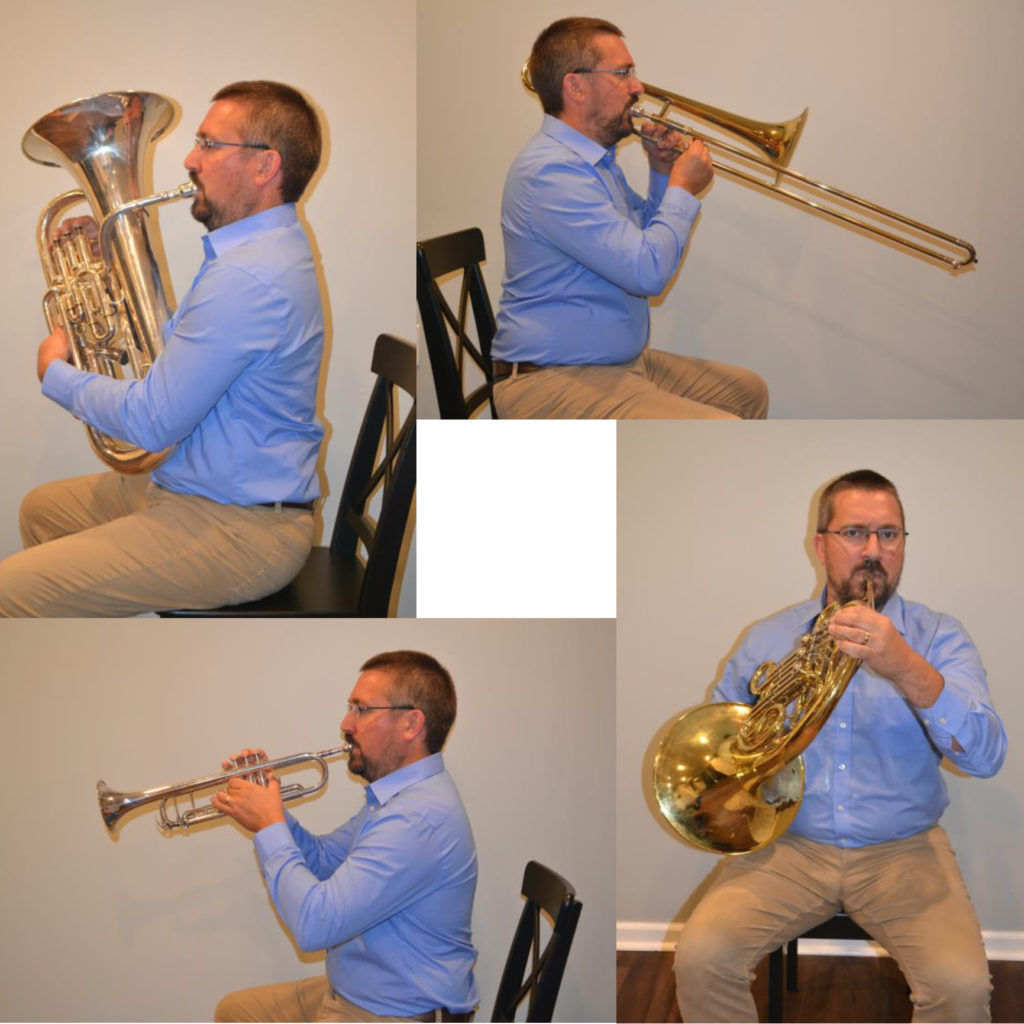
While each brass instrument has its own peculiarities, many elements are common across all brass instruments related to posture, breathing, and embouchure. Within each instrument, we will discuss variations on the fundamentals that follow, but all brass instruments utilize the same elements. It is important as a teacher of brass students that we emphasize these fundamentals for all students before they have the instruments in their hands and continuing throughout their brass playing careers.
Posture
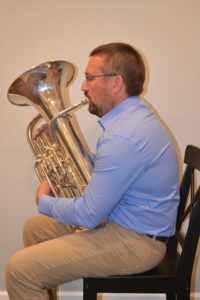
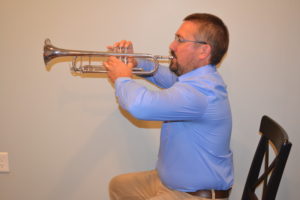
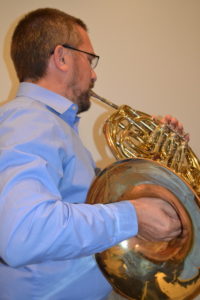
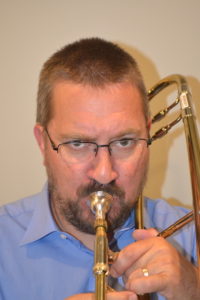
The two most important aspects of all brass playing regarding posture are that the torso stays symmetrical and well balanced and that the entire body is relaxed and comfortable. This open position allows for free breathing that is critical for all brass playing. If the arms are kept close to the body or the back is collapsed, the lungs are less able to fully inhale with ease, resulting in a stuffier sound, limited sustain, and greater fatigue. Beginning players should have proper posture emphasized from the first lesson on, so that habits are established that become automatic. Importantly, proper posture should be established before introducing the instrument, and the instrument should always be brought to the body that is already in proper posture. Beginning players will often base their posture off of the instrument’s position, which can lead to twisted torsos and collapsed bodies that inhibit good air flow and tension-free manipulation of the instrument.
Torso
Symmetrical and vertical posture in the torso establishes a foundation for all brass (and woodwind) playing. Before students have instruments in their hands, teachers should establish proper posture. Start by having students stand, as they are less likely to allow the back to collapse. An emphasis should be placed on vertically aligning shoulders, hips, and arches of the feet while keeping the spine centered and extended. The body always remains symmetrical without any twisting or favoring of one side of the body over the other. Once seated, the shoulders should stay aligned with the hips, allowing for a comfortable, tall orientation of the spine. The head should be held comfortably up so that the chin is pulled away from the throat. One exercise that can be done is to place the hand on top of the head and envision pulling an invisible string upward, as though suspended like a marionette.
Proper torso alignment can also be established by having the students stand with their feet shoulder width apart. Allow the body to collapse at the waist, with the arms hanging to the ground. The students should slowly roll their body up on a slow count. Every fourth count, a different part of the body should be in place.
Shoulders are a frequent issue for beginning brass players. The upper torso should be open by having the shoulders rolled back with relaxed arms. At the same time, the shoulders should not be hyperextended by bringing the shoulder blades together, creating tension across the front of the upper torso. One exercise to establish proper shoulder placement is to have students start with their shoulders collapsed forward. They should then roll their shoulders up and back, stopping once they are comfortable. This action will create a naturally open, tension-free shoulder posture.
In brief, the key considerations for proper posture include the following:
- Hips lined up vertically over the arch of the foot
- Base of the neck lined up vertically over the hips
- Shoulders comfortably rolled back allowing for the open presentation of the upper torso.
- Head raised comfortably with slight elevation of the chin.
Common Issues for Torso Posture
Collapsed back-Students frequently will slouch, allowing the lower back to collapse and the shoulders to come forward. This posture diminishes lung capacity and limits full breath support. Related issues include elbows or the instrument resting on the leg. Visual cues (e.g. marionette string on the head) and posture establishing exercises (e.g. rolling the body into position) can help to reinforce proper posture.
Exaggerated posture-Beginning players seeking to please their teachers often will exaggerate their posture by pushing the upper torso forward, pulling the shoulders back too far, and bending the head back to create tension in the throat. This pushes bell front instruments above a position parallel to the floor, akin to what is often seen in marching band. These over-exaggerations lead to increased tension in the back, neck, and arms that can inhibit relaxed air support and easy manipulation of the instrument.. For these students, the roll up exercise can be very effective while the teacher watches to remind students of where to stop their unroll.
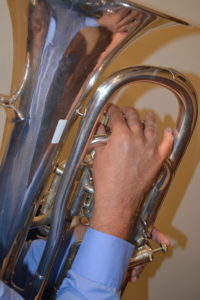
Arms and hands
For all instruments, relaxed arms and hands with limited tension are critically important for both proper technique and good ergonomics. When students introduce tension into their elbows, wrists, and fingers, they create issues that inhibit fluid performance and promote long term health issues such as muscle soreness, tendonitis, and focal dystonia.
As a general rule, sharp angles should be avoided, especially in the wrists and fingers. Attention should be given to ensure that arms and wrists do not collapse. Good posture allows for space between the arms, the body, and the instrument.
For a neutral position, the upper arm should be comfortably away from the torso of the body so that the rib cage can naturally expand when deep inhalations are made. Shoulders should be relaxed and fall naturally down, and there should be space between the elbows and the musician’s sides. When taking a deep breath, the arms should not need to move.
While the exact positioning of fingers and wrists differ from one instrument to the next, there are few considerations that apply to all wind instruments.
- Wrists and fingers should be positioned in continuous lines and curves. No severe angles should be present.
- The hand forms a C shape when you play. Fingers should not be completely flat, and for brass instruments, the tips of the fingers should be used on top of the valves
Common Issues with Arms/Hands
Fly-away arms-Beginner players will often exaggerate their arm placement, positioning the arms close to parallel to the ground. This posture inhibits good air production and can lead to repetitive stress injuries. Students should drop the arms to their sides and return to playing position, with attention to allowing the arms to naturally hang.

Collapsed arms or wrists-Students will often allow their arms to collapse against their rib cages or collapse the wrists in to their instruments. This posture limits air support and can lead to stress injuries. Students should set their instruments down and allow their arms to hang at their sides. They should take note of how the arms naturally hang away from the rib cage and should seek to imitate that posture. Regarding collapsed wrists, specific details for correction of hand position can be found in discussions of individual instruments, but in general, there should be a continuous curve through the wrists and fingers without any right or acute angles. Attention should also be given for flat fingers which slow down agility.
Breathing
When playing brass instruments, musicians should focus on deep breathing that allows for the full expansion of the rib cage. This approach to breathing is different than typical breathing in life, which tends to use just the upper portions of the lungs and require little expansion of the rib cage. It is critical that beginning brass players are taught proper breathing for sustaining full tone of their instruments, and that regular exercises for introducing proper breathing and expanding lung capacity are a part of warm up activities.
Technique
Brass breathing should focus on maintaining open, relaxed airways on both the inhale and exhale. The oral cavity and throat should be open (think “ahhhhh”) and expansion should be felt in the across the width of the rib cage and down in the lower torso. The shoulders should not move when breathing deeply.
The exhale should come immediately without pause and should require effort. Again, the oral cavity and throat should remain relaxed, though a firmness should be felt in the abdominal muscles when exhaling. Emphasis should be placed on a full exhale which leads to the need for immediate inhale.
All breathing on brass instruments should take place through the mouth.
Whenever you are practicing breathing techniques, make sure to be seated. It is very easy for students to experience light-headedness when developing proper breathing technique because they ae frequently not accustom to deep breathing, which alters oxygen intake.
Breathing Technique Exercises
Yawn breathing-When first introducing brass instrument breathing, students should be instructed to yawn. While the position of the jaw is not consistent with good brass playing, the expansion of the rib cage and dropping of the lower abdomen is consistent with good brass playing. For most students, this is one of the few times in which full lung capacity is engaged.
Timed breathing-To allow students to develop awareness of their own breathing and to start to build capacity, timed breathing exercises should start every practice session. Students should be seated during this activity, at least at first, to promote proper posture and to ensure that students do not fall over if they become light headed. Initially, the time frame should be short and balanced with 4 counts breathing in, and 4 counts breathing out. On each inhale, students should focus on reaching their maximum lung capacity while feeling rib cage expansion and the drop of the stomach. On each exhale, students should make an effort to fully exhaust their breath. There should be no pause between inhale and exhale. As students become more comfortable with the activity, times can be extended to 8 and 16 counts of exhale, with an emphasis on continuous and steady intake and exhale of air.
Paper airplane-This exercise emphasizes the reversal of inhale to exhale and the ability sustain both inhale and exhale smoothly. Imagine that you have a paper airplane between your thumb and first finger. Hold the paper airplane in front of your face. As you pull your hand back toward your ear to throw, take a deep breath in that allows for the expansion of the rib cage and drops the lower abdomen. Immediately “throw” the airplane, turning your air from inhale to exhale and steadily blowing the airplane forward. When you are out of air in your lungs, immediately bring the airplane back again while breathing in and repeat the exercise. Make sure that you do not pause between inhale and exhale.
Breathing Capacity Exercises
Three sips-This activity is a variant on timed breathing to build on inhale capacity. You will still do a controlled inhale over 4 counts, but instead of immediately turning to the exhale, pause, take 3 sips of air, and then do a controlled, timed exhale. Each time you do the 3 sips, you should feel expansion in your rib cage that should border on discomfort.
Santa-This activity focuses on increasing air exhale capacity. It begins with a timed inhale of 4 counts, followed by 3 loud “Ho, Ho, Hoooo” with the final syllable being sustained fully for 2 counts. Emphasis should be placed fully expending all air after 4 counts, and being able to fully fill the lungs after 4 counts. Once students can reliably inhale for 4 counts, the inhale should be shorted to 2 counts, and eventually 1 count.
Breathing Control and Resistance Exercises
Stiff breeze-This exercise allows for the visualization of steady, controlled exhale. Hold a tissue in front of the face with the thumb roughly 2 inches from the tip of the nose. Inhale with a full breath, and then exhale on a “puuu” syllable. The emphasis should be on blowing the tissue as flat as horizontal as possible without varying air speed or direction. Once this able to be done close to the face, the hand can be moved further away to increase attention on steady air speed and direction. This activity can also be done with the mouthpiece to focus on air speed and direction.
Sizzle-This exercise allows for controlled air exhale with the resistance that naturally occurs because of the embouchure and mouthpiece. When exhaling, articulate and sustain the consonant “Tssss”. The focus should be on a continuous hiss without change in pitch or tone. Continue until air is completely expended from the lungs. As students continue to engage in this exercise, they should focus on extending the exhale to 15 seconds or more.
Common Issues for Brass Breathing
Shallow breathing-Shallowing breathing is can be diagnosed in many different ways. The pitch of the inhale is very high with a raspy tone, indicative of a tight oral cavity. There is also limited rib cage expansion as the breath is controlled by the upper chest as opposed to the lower abdomen. Often, students will raise their shoulders when they breathe, which further inhibits deep breathing. To fix this problem, the technique exercises listed above should be done, with a focus on expanding the rib cage. The yawn exercise in particular is a great one for teaching students how deep breathing feels.
Weak exhale-Students will often take a strong inhale, but experience issues with having a controlled, strong exhale. Sound quality is the clear give away for this issue, as the tone on the instrument will be very airy and pitch and tone will fluctuate. Students will often also lose good posture, with the shoulder and back collapsing on the exhale. The sizzle exercise is a great diagnostic tool, as the teacher can hear whether tone quality fluctuates. The same exercise is also good for developing the student’s awareness of their own technique, which can lead to better technique. Attention to proper posture is also key.
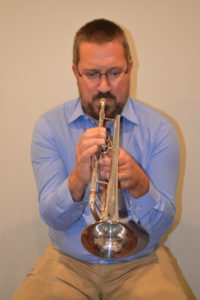
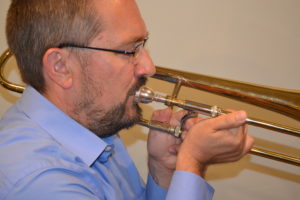
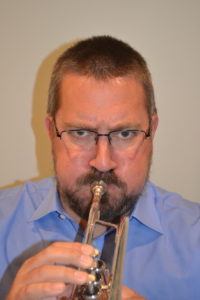
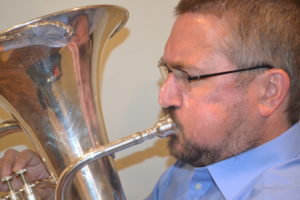
Embouchure
The embouchure refers to the positioning of the lips, jaw, and oral cavity. Unlike other instruments, the sound of brass instruments is created by the vibration of the musician’s body, specifically their lips. The instrument serves to focus and amplify the sound of lip vibration, which is called buzzing. Just like posture and breathing, the key to proper embouchure is limiting tension and allowing for free flowing air. While each brass instrument has a slightly different embouchure, the fundamentals for all brass instruments remain the same.
Jaw placement
While there is not a single “correct” embouchure, most successful brass musicians position their upper and lower jaws evenly vertically or with a slight underbite. This is not to say that a student with a severe under or overbite cannot play a brass instrument, but they will need to work on maintaining balance between the upper and lower lip to allow for free flowing air and relaxed buzzing. An ideal embouchure will be flat from the base of the nose to chin. The teeth are slightly separated, with the space between the lips increasing the larger the mouthpiece becomes. Attention should be placed to ensure that the jaw muscles by the ears remain relaxed and are not clenched while playing, especially when playing in the upper register.
Jaw Placement Activities
Vowel shaping-As we cannot see into our students’ mouths as they play, the use of kinesthetic reminders is useful in brass playing. Have the students sing or sustain the syllable, “Ahhhh.” Then have the students sustain the syllable, “Eeee.” Discuss the differences they feel in their jaw and tongue placement as well as the tension they feel throughout their oral cavity. Identify “Ahhh” as the proper placement of jaw and tongue.
Face shaping-Have students place their hands on their cheeks so that their finger tips are positioned between their upper and lower molars. They should feel slight space between the back molars with no tension in the jaw muscles near the ears. This activity can be done at the same time as vowel shaping.
Lips
The lips create the sound of all brass instruments, so attention should be placed on maintaining a firm but relaxed presentation of the lips. A good brass embouchure will provide a fleshy pad for the mouthpiece. The center of the embouchure, inside of the mouthpiece, should be relaxed with as little tension as possible. Each brass instrument’s embouchure is slightly different, but typically, there should be a roughly even balance of top and bottom lip within the mouthpiece. If the muscles in the center of the mouth are used to control the embouchure, tone will become thin and bright.
The corners of the mouth provide for the control of the embouchure. Corners should be firm, allowing for the center of the embouchure to remain soft. The corners of the mouth control two aspects of brass playing: tone quality and pitch. The tighter the corners are, the brighter the tone and higher the pitch. Beginning brass players should be regularly reminded to control their sound from the corners of the mouth, allowing for center of the mouth to remain fleshy, allowing for full buzzing.
The presentation of the proper brass embouchure is a flat line. Care should be taken that students neither smile nor frown when playing, as these expressions introduce tension into the lower lip.
Exercises for Setting Up the Embouchure
Deep breath exhale-The embouchure should feel natural and relaxed. One way to set the embouchure is to have the students take a deep, yawning breath in and then close the lips on the exhale, allowing the air to escape through the nose. When doing this exercise, students should be reminded to stop closing once the lips touch. Their tendency will be to continue to close the jaw and clench the lips together.
Hum-Another way to establish the embouchure initially is say, “Hmmmmm.” The hum should be a loud, buzzy hum, encouraging the students to maintain an open oral cavity, relaxed jaw, and just-touching lips. Similar to the deep breath exhale exercise, students should be reminded to stop closing the lips as soon as they touch.
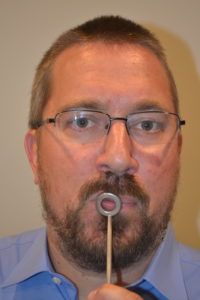
Pea spitting-The final step in setting up a proper embouchure is establishing the aperture, which is the hole in the embouchure through which air moves. Keeping this part of the embouchure focused yet relaxed is the single most important part of the brass embouchure as it is the part that creates the buzz sound. Once the embouchure is established, students should envision that they are spitting peas, allowing for a fast stream of air to move through a focused space in the embouchure. They should be reminded that if they pinch the lips together, the “pea” will be smashed. Alternately, they can also articulate the diphthong “pff” to create the same effect if you prefer not to encourage thoughts of spitting. This can be combined with the Hum exercise as well, making the syllable, “Hmmmph.”
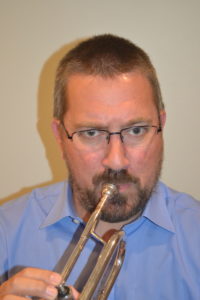
Introducing the mouthpiece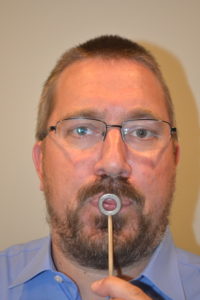
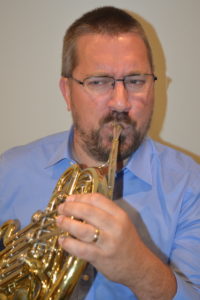
Students should demonstrate the ability to make the proper embouchure before introducing the mouthpiece for two reasons. First, the mouthpiece blocks the teacher’s view of the aperture of the embouchure, making it difficult for the teacher to see errors. While mouthpiece visualizers can be used, the need to sanitize them between students makes them impractical for group instruction. Second and more importantly, students have the tendency to adjust the embouchure to match the mouthpiece, making it feel “right.” This often results in erroneous embouchures that force too much lip into the mouthpiece or introduce tension through the center of the embouchure.
The mouthpiece should be introduced separate from the instrument. When playing just the mouthpiece, the shank of the mouthpiece should be held between the thumb and first finger. Care should be made to keep the wrist relaxed so to discourage the introduction of lateral pressure on the embouchure. The mouthpiece should be placed gently on the embouchure with the middle of the cup centered on the aperture of the embouchure. Student should be reminded to set the mouthpiece lightly on the embouchure, avoiding pushing it into the face or adjusting the embouchure once the mouthpiece is placed.
Details for creating first sounds on both mouthpiece and the instrument will be discussed in the next chapter.
Common Issues for Embouchure Setup
Smashed aperture-Students will have a tendency to pinch the middle of the embouchure together, either pucker as though to kiss the mouthpiece or bunching the chin up under the mouthpiece. Both of these situations limit the free buzzing of the lip, inhibit full tone, and can lead to long term muscle problems due to tension. Return to the Hum or Deep breath exhale activities without the mouthpiece to establish proper embouchure.
Cheek puffing-While some brass players naturally experience some cheek puffing when they play (most famously, Dizzy Gillespie), in general, cheek puffing should be discouraged as it is sign of limited control of the embouchure from the corners of the mouth. When students puff their cheeks, they place undue stress on the center of the embouchure, leading to poor tone and control, quick fatigue, and possible muscle damage. The Pea spitting activity can help to discourage cheek puffing. Additionally, once the student is playing the instrument, playing long tones in the lower register can help build muscle control that will come into play in the upper register where cheek puffing often occurs.
Mouthpiece placement-Ideally, the mouthpiece should be centered on the embouchure both horizontally and vertically (though there are some individual instrument differences). Individual students may have specific reasons for misplaced mouthpiece placement, including dental peculiarities, skeletal abnormalities, and pronounced under or overbite, but generally, most students should be able to play with the mouthpiece centered on the embouchure. Misplaced mouthpieces can result in quick fatigue and tone and control issues as one side of the embouchure is more responsible for control than the other. It is critical that errors in placement are corrected early in a student’s brass playing career, as muscles will compensate for misplacement and habits will be built that are hard to correct later. For beginning players, there will be little difference in tone quality because of misplaced mouthpieces, but the differences will become more pronounced as the student proceeds forward. With this said, there are tremendously successful brass players (e.g. Jon Faddis, Maynard Ferguson) who play with asymmetrical embouchures with great success.