
11 The Trumpet
The trumpet is the treble most standard member of the brass family. Trumpet-like instruments have a long lineage, as fanfare style trumpets have been found in ancient Egypt, China, and South America. The primary identification of a trumpet is its cylindrical shape, distinguishing it from the equally ancient horn. Unlike the horn, the trumpet has historically always been made of metal, giving it its characteristic brightness and strong presence. The modern trumpet exists in many keys. The standard “beginner” trumpet is keyed in Bb, though C and Eb are commonly used in orchestral and solo literature. The piccolo trumpet, which is pitched an octave higher than the standard trumpet, is often found in the keys of Bb and A. Other instruments in D, F, G, and A are also occasionally used for specific purposes.
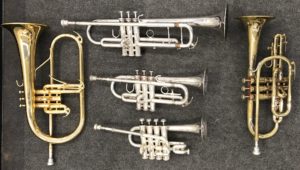
Center (top to bottom)-Bb Trumpet, Eb Trumpet, Piccolo Trumpet
Right-Cornet
The trumpet has numerous close brass relatives which utilize the same fundamentals as trumpet regarding embouchure and performance practice. The cornet was one of the most common instruments in bands at the beginning of the 20th century, and differs from the trumpet in its conical bore, more compact construction. It has a smoother, warmer tone than the trumpet. The flugelhorn is another common relative, frequently used in jazz settings. It is characterized by a mellow tone.
Characteristics for Beginning Trumpet Players
It should be noted that the best instrument for a student is the instrument that the student wants to play. This is no different for the trumpet. With very few exceptions, any student can be an effective trumpeter. With that said, there are characteristics that make for a stronger beginning trumpet player.
Mouth shape and specifically dental characteristics are important. The top and bottom teeth should be roughly aligned with one another or there can be a slight underbite. The front top teeth are particularly important as they form the foundation for the mouthpiece Students with braces or other orthodontics may experience pain when playing trumpet. Wax or various mouthguards can be be placed on top of the teeth to reduce pain.
Lip shape can be an issue for some students who have a teardrop in the center of their lip. This can impede the formation of an effective aperture. The fullness of lips is seldom a major issue for trumpet players, but some students with extremely full lips may find it difficult to control tone in the upper register. Students who have unusual lip structures may be better suited for low brass, but again, trumpet players with all sorts of face structures have been highly effective musicians. Passion for the instrument should be the first and biggest determinant of a future trumpet player.
Setting Up the Trumpet
Most of the fundamentals of good brass playing are common for instruments, including trumpet, as outlined in Getting Started with Posture, Breathing, and Embouchure. When first playing the trumpet, it is critically important that students are set up with good posture that allows for free breathing and limited tension throughout the body.
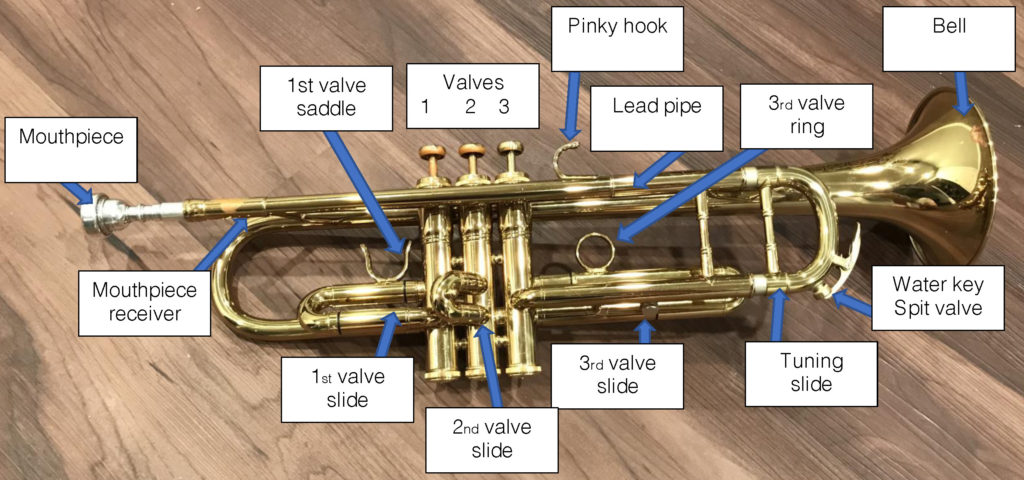
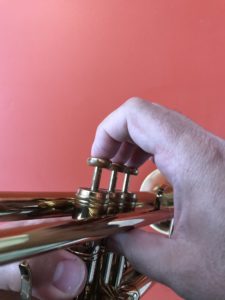
When playing trumpet, both hands should be in the shape of a relaxed C. The weight of the trumpet is supported by the left hand. The thumb should sit wrapped around the valve casing and resting comfortably in the 1st valve slide saddle. The middle or ring finger (which ever is more comfortable) should be inserted into the 3rd valve slide ring. On many instruments, this ring is adjustable to the size and shape of the player’s hand. The other fingers should sit on top of or to the side of the 3rd valve slide. Avoid wrapping the fingers underneath the slide as this increases hand tension and limits movement of the slides.
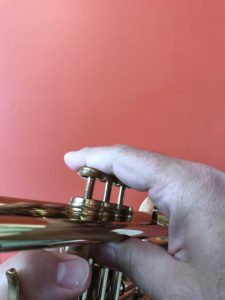
The right hand controls the valves, which are number 1, 2, and 3 starting closest to the mouthpiece. The thumb should sit loosely underneath the lead pipe between the first and second valve casings. The index finger, middle finger, and ring finger should set on top of the valves. Contact should always be made with the valve with just the tip of the finger. Make sure to keep fingers arched, both to limit tension and to reduce the amount of movement required to push down valves. The pinky should either sit on top of the pinky hook or be allowed to float freely. The pinky hook is only used for one handed playing (e.g. when using hand held mutes) or for visual effects (e.g. marching band).
When bringing the instrument to the face, make sure to set posture first and then set the mouthpiece lightly on the embouchure. While there is much discussion of the “perfect” embouchure, the mouthpiece should be centered left to right and be positioned roughly 50/50 on the top and bottom lips. Ideally, the extreme top and bottom of the rim should sit on the non-red part of the top and bottom lip.
Trumpet-specific details and concepts
As mentioned in the previous chapters, many of the details of trumpet playing are common to all brass playing concerning technique, tone, and practice. Make sure to reference the general sections regarding each of these issues in addition to the trumpet specific details below.
Range development
As with all brass instrument, range development tends to be slow compared to woodwind and string instruments. Because there is muscle development required to move between shelves, beginning trumpet players often have very limited ranges of around an octave. It is critical that students are not rushed to play higher notes than they can control without pressure and with good air control. Long tones and interval studies are critically important for beginning trumpet players, more so than other brass instrumentalists, so that they build the muscle tone and control to be able to play in higher registers.

Follow this link for a trumpet fingering chart.
Intonation Control
Two of the valve slides are adjustable as students play–1st and 3rd. These adjustments should be considered part of the fingering for the instrument. As students develop their consistency and ability, they should spend time with tuners to identify exactly how far to move the slides.
The 3rd valve slide (often referred to as the D ring) is used for 1-3 and 1-2-3 combination, specifically d4 and c#4. Both of these pitches are extremely sharp and the adjustment of the 3rd valve slide extends the length of the trumpet, moving the pitch flat. The exact distance will vary by instrument and player, but should be roughly 1/3″ for d4 and 1/2″ for c#4. Student should be reminded to pull the 3rd valve slide back in for eb4 and other 2-3 combinations, as these are already extremely flat.
For intermediate students, they will need to pay attention to 1st valve intonation in the upper register, particularly for a5 using the 1-2 fingering combination. The 1st valve slide (also called the A saddle) is pushed out by 1/2″ to lengthen the tubing for high A, lowering the pitch the flat. It can also be used to assist with smaller intonation issues on e4 and f5
Otherwise, intonation adjustment is made entirely through embouchure and air adjustment.
Mutes
Of all brass instruments, trumpet players are expected to have the greatest variety of available mutes. Mutes serve to alter timbre and projection of instruments.
Standard Mutes
Straight mute-This is the most common mute for trumpet players. If a part calls for “with mute” or “con sordino,” a straight mute is typically being expected. Straight mutes come in many different materials, each of which have a different timbre. The most common variations are fiber board “stone lined mutes” (characterized by their red and white painted finish) and metal mutes of aluminum, steel, copper, or brass. The straight mute is pushed into the bell and is held in place by its three corks. The straight mute greatly reduces the volume of the trumpet and removes lower overtones to create a bright, almost metallic sound. Depending on construction, the straight mute may also make the trumpet sharp, so adjustments should be made either to the tuning slide or the embouchure. It is common for more advanced players to have multiple straight mutes of different materials (fiber board, metal, plastic, wood) to create different timbres.
Cup mute-The cup mute looks like a straight mute with a bowl attached to its base and comes in both fiber board and metal. The cup mute muffles the tone of the trumpet by redirecting the upper overtones back into the instrument.
Specialty Mutes
Wah-wah or Harmon mute-The wah-wah mute is a fixture of certain jazz styles, comprised of a bulb shape with a small hole in its base, which can be expanded with a stem. The cork completely seals the bell, so all air must pass through the hole in the mute’s base. When the stem is out, the tone is very mellow with greatly reduced volume. When the stem is in, the tone is very direct and buzzy. By placing the hand or a plunger over the stem opening, the characteristic “wah-wah” sound can be made, which bends both pitch and tone. This must makes instruments extremely sharp, so the tuning slide should be adjusted when using the wah-wah mute.
Plunger mute-The plunger mute is exactly that-a sink plunger. The plunger mute is held in the hand of the player by placing their wrist on the bottom of the bell, which acts as a hinge to open and close the bell. When closed, the plunger lowers the pitch of the instrument and cancels upper overtones. The plunger mute is often opened and closed to create a “wah” effect, especially when combined with a wah-wah mute. Opening and closing will be notated in the music using + to show closed and o to show open, placed above or below the note. A variation of the plunger mute is a hat mute, from the period when men commonly wore bowler hats which were used similarly.
Bucket mute-The bucket mute is a bowl or bucket with three springs on the rim that attach over the trumpet bell. The bowl is full of batting to soften the tone and dynamic of the trumpet.
Practice mute-Practice mutes look like straight mutes stuffed with batting. They are designed for quiet indoor practice. Caution should be used with practice mutes as they add a great deal of back pressure that can cause harm and develop bad habits.
Other mutes-As long as there have been trumpet players, there have been many various additional mutes, most of which are variations on those listed above such as pixie, buzz, and solotone mutes. The ones listed above will be commonly requested in literature, where additional mutes are often used for specialty settings. They are great to have for the purpose of contrast, especially for the jazz musician, but will seldom be requested specifically in a given piece of music.
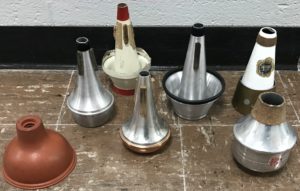
Plunger, Straight mute, Cup mute, Straight mute, Adjustable cup mute, Practice/Whisper mute, Wah-wah/Harmon mute
Unique Issues for Trumpet
Tension-While tension can be an issue for all brass players, trumpet players frequently encounter pressure and tension when working on expanding their upper register. This can be seen in strain in the throat, pinching in the center of the embouchure, and tightness in the arms. This tension can inhibit good tone development and over time cause longterm injury. To address this concern, make sure that students are not forced to expand their register too quickly, something that often happens as they transition into split parts in ensembles. Second, encourage students to warm up thoroughly and continue to practice long tone and interval studies which build muscle tone and control which aid upper range development.
Anchored pinky finger-The most common source of inappropriate pressure comes from the pinky finger on the right hand when students use the finger hook, sometimes referred to sarcastically as the “octave key.” By encouraging students to keep the pinky on top of the finger hook or allowing it to move freely, students will not develop the habit of using the pinky ring to push pressure on the embouchure when playing in higher registers.
Slide adjustment–Many beginning trumpet players will not use the third valve slide to adjust D and C#, leaving these two notes extremely out of tune. The use of the third valve slide should be taught as part of the finger for these pitches, while the specific placement of the slide can be refined once students have developed greater consistency in pitch and tone.
Flat fingers-It is common for student trumpeters to develop flat fingers on top of the valves, where the valves are depressed by the joint on the finger rather than the tip. This creates two issues. First, flat fingers require more movement to depress the valves, leading to slower fingering transitions. Second, flat fingers introduces tension into the hand, which can lead to tendinitis, carpal tunnel, or other repetitive stress injuries.
Equipment changes-Trumpet players are renowned for being finicky about their instruments, specifically their mouthpieces. While there is some merit for advanced players to have specific mouthpieces for specific tasks (e.g. small shallow mouthpieces for extreme register, deep cupped mouthpieces for darker tone), beginning and intermediate players should choose a standard mid-sized mouthpiece upon which they can develop consistent technique and tone. For beginners, a 5C or 7C mouthpiece is recommended. For intermediate players, they will want to transition to a slightly larger mouthpiece, such as a 3C (These sizes use Bach’s sizing system. Charts can be found on line easily that translate different sizing systems for mouthpieces). Frequent changes in mouthpieces for young players can lead to poor development of embouchure and inconsistent fundamentals that inhibit later growth.
