
29 Designing and Using Visual Aids to Reach an Audience
Chapter Objectives
Students will:
- Construct visual aids that fulfill eight design principles.
- Use visual aids effectively during a speech by following five usage principles.
The previous chapter introduced you to three types of visual digital aids: presentation software, video, and audience-interactive visual aids. Understanding the strengths and drawbacks of each is helpful. However, knowing how to design and use them effectively is essential.
This chapter gives you specific advice—dos and don’ts—for designing and using visual aids. Much of what follows applies to any of the three types of visual aids, and we will highlight how as we go. We begin with designing or preparing visual aids. We then turn to using or incorporating visual aids into a presentation.
Design Principles
In the previous chapter, we established four goals for visual aids: increase the clarity of your message, enhance audience attention and recall, strengthen your credibility, and improve your effort to inform or persuade the audience.
How do you produce visual aids that help accomplish these goals? We offer eight design principles—or advice to follow—to guide your preparation: visual aids should be visual, less is more, consider spacing and positioning, use color strategically, consider what your visual choices suggest, consider readability for all audience members, strive for high quality, and follow copyright and academic honesty rules.
Visual Aids Should Be Visual
We begin with the design principle—and reminder—that visual aids should be visual. If you are tempted to put blocks of text or bulleted lists into presentation software or a video, stop yourself. Ask if that same information can be communicated visually. For example,
- Can you show a photograph of the person you are quoting rather than simply typing the quote?
- Can you display a fraction, like ¾, by displaying four stick figures and coloring three of them blue and one green rather than just writing ¾?
- Can you illustrate your point through a visual metaphor? Consider the example in box 29.1.
Box 29.1 Making Visual Aids Visual
Notice the following difference between a visual aid that presents information about plastic waste in textual form (on the top) and a visual metaphor (on the bottom).
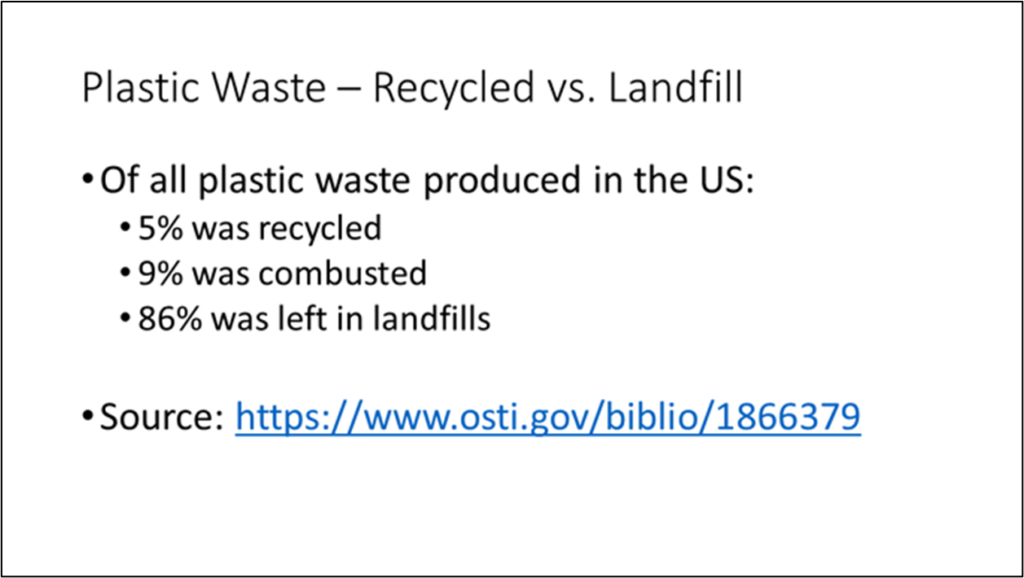

As you design your visual aids, reduce the number of words wherever possible and think of ways to visually communicate the information instead.
Less Is More
A second design principle is “less is more.” Any graphic designer will tell you not to be afraid of white space, or the empty space between elements on a slide or on the screen. Your audience will have a much easier time processing your photo, chart, or video footage if it is not overcrowded with information.
As you put together your visual aid, ask yourself, What is its central message? Will the audience have their eye drawn to that message?
- On slides, for instance, avoid putting multiple images—say, two charts and a photograph—on one slide. Instead, choose the single most impactful image to communicate the message. Give each image its own slide or moment if they make different points.
- In video, avoid adding multiple cuts, visual effects, and animation to a single segment. Allow for some degree of stillness so your audience can focus on the footage itself.
- When using audience-interactive visual aids, beware of pairing them with additional visual aids. It can be very difficult, especially for an older audience, for example, to skim viewers’ live chats while also watching a video clip.
Consider Spacing and Positioning
Third, consider spacing or positioning when designing visual aids by paying attention to alignment and proximity. Alignment is the deliberate placement of the elements within a given slide or frame. Alignment includes how photos, text, and captions are lined up with one another (center them, left-justify them, etc.). You don’t want anything to look randomly placed. When elements on your slide or in the camera’s frame, like corporate logos or titles, have visual similarity in where they appear and in relation to one another, your presentation looks more professional.
Proximity says that items that are similar should be placed next to one another. Placing items together creates a visual unit, and the eye readily understands that these elements are part of a group. If you are talking about the advantages or drawbacks of a particular solution, for instance, the proximity principle says,
|
The advantages should appear together, |
and |
the disadvantages should appear together. |
Mixing or randomly placing these elements confuses rather than clarifies. The purpose of proximity is to help organize the material for the audience.
Box 29.2 Using White Space and Alignment in Visual Aids
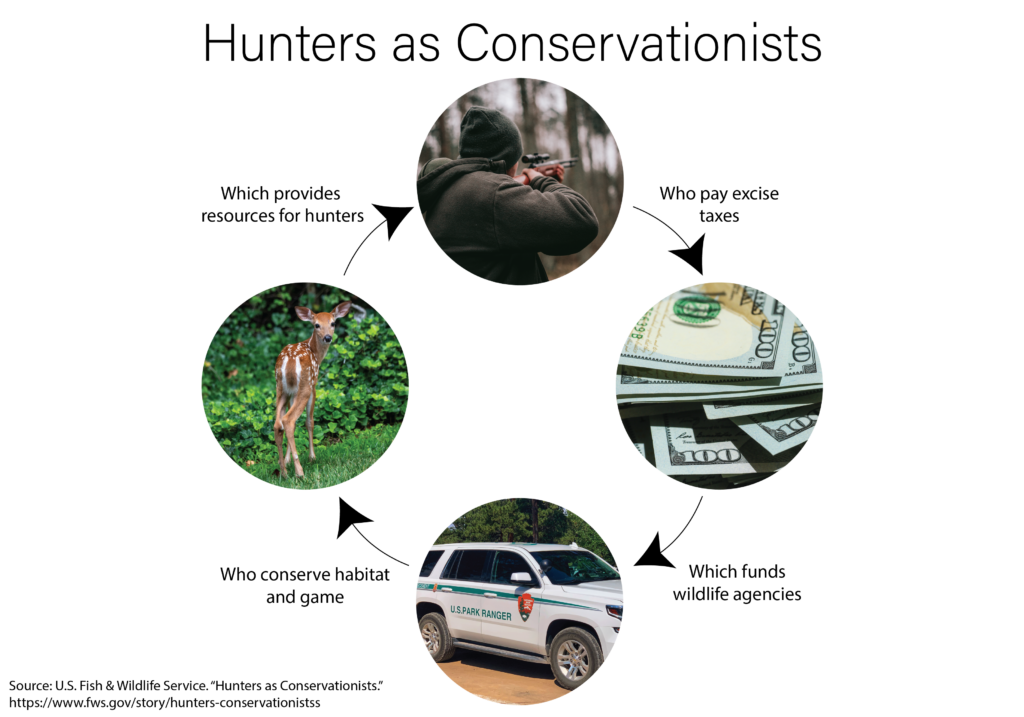
Imagine a student who wants to deliver a speech that advocates the ecological benefits of hunting.
Slide A: This slide was hastily designed. It offers a confusing and crowded collage of images associated with hunting. The audience would not be sure what to focus on or what conclusions to draw from it.

Slide B: This slide more effectively supports the student’s message because it strategically incorporates white space and aligns images in a meaningful way.
Right-click image to enlarge in a new tab.
Use Color Strategically
A fourth design principle is to use colors strategically, such as through contrast and harmony. Visual contrast is optical difference, and the idea here is that you should make elements that are different from one another in kind visually different as well. For example, imagine using the following:
|
An orange background for images of trash contrasted with… |
|
a green background for images of recycling. |
|
Gray tones for items that cannot be recycled, contrasted with… |
|
bright colors for items that can be recycled. |
Contrasting colors can create a visual “pop” and quickly help the eye determine what is important or different.
Visual harmony, on the other hand, is the pleasure produced by colors that complement or go well together. You generally want all the colors you choose on a given visual aid or within a video, even when contrasting, to produce harmony (thus, orange and green work nicely together even as they contrast). When color choices are disharmonious—such as if you pair canary yellow with neon green—the resulting visual aid can produce discomfort and distract the audience.
Consider What Your Visual Choices Suggest
Fifth, consider what your visual choices suggest. Rhetorical scholar Sonja K. Foss writes that we can understand and evaluate the nature of an image by paying attention to both its presented elements and its suggested visual elements. Presented visual elements are the “major physical features of the image,” such as size, color, shapes, form, background, and so forth. Suggested visual elements are “the concepts, ideas, themes, and allusions that a viewer is likely to infer from presented elements.”[1] In other words, suggested elements may help us determine how audiences receive and understand the image.
Many types of visual choices communicate information to audiences:
- We already mentioned that alignment and proximity can suggest similarities or distinctions among visual elements.
- Size differences can allude to distinctions such as inferring the superiority of large images compared to the weakness or inferiority of smaller images.
- Certain colors can suggest emotions and associations. We relate red with anger, passion, and danger, for example, and pink with femininity. In Western cultures white connotes purity (the origin of the traditional white wedding dress), whereas in China, white is associated with death and is the color of mourning. Chinese brides wear red, a color that signifies good fortune.
Cultural contexts may be important to keep in mind as you anticipate what your visual choices suggest to your audience. For an example of how to use presented visual elements effectively to suggest information that supports your point, read box 29.3.
Box 29.3 Visual Elements Function Rhetorically
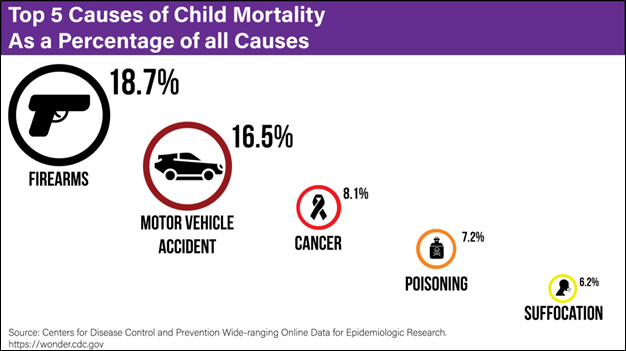
If you delivered a speech about the harms of firearms for children in the US, which slide would better communicate your message?
Slide A: This slide presents disharmonious colors, making it unpleasant to look at. Also, its visual layout suggests that all causes of child mortality are equal even though the percentages indicate otherwise.
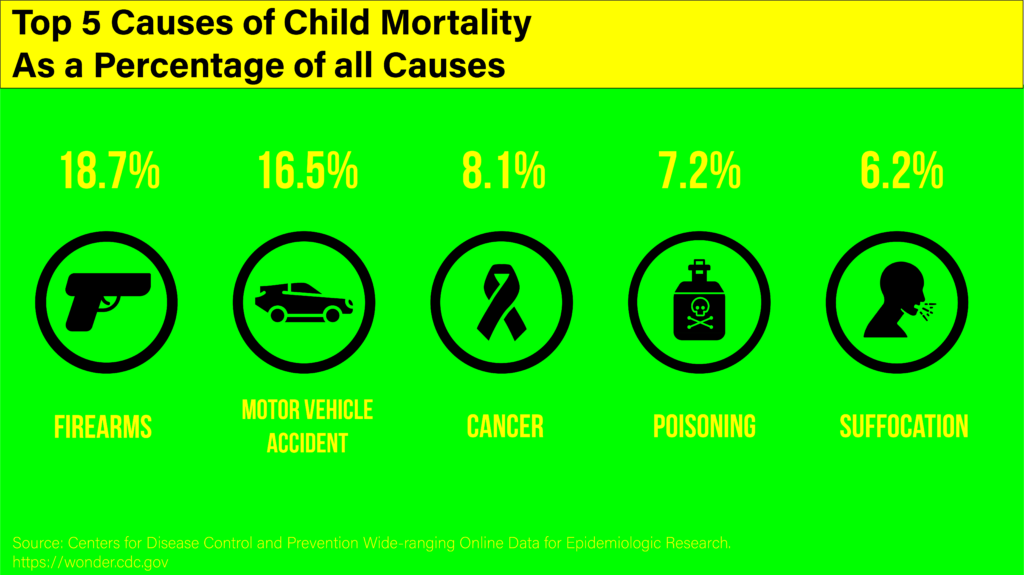
Slide B: Notice how this slide makes use of differences in positioning, size, and harmonious colors to suggest that one cause of child mortality—firearms—is greater and more worrisome than the others. We tend to associate height, larger size, and darker colors with importance or authority.
Ensure Readability
Sixth, consider readability for all audience members. Remember that what is clear and visible on your computer screen may translate well for viewers watching through a screen remotely, but not for an in-person audience when projected onto a screen. Yellow, for instance, can be very difficult to read when projected, especially against a white background.
Remember, too, that audience members may have varying quality of vision. Thus,
- As you choose images and fonts, go larger than you might otherwise and avoid overly fancy or embellished font styles.
- If you are showing video and want audience members to see particular elements, pause the video and point to those elements or also use (possibly enlarged) still shots taken from the video to ensure everyone can see the crucial parts.
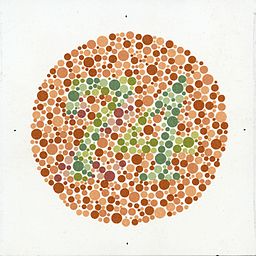
- Know, too, that a fair number of people have color vision deficiency (frequently referred to as being color blind), meaning they struggle to see differences between colors. Two of the most prevalent forms of color blindness are between red and green and between blue and yellow. So if you want to contrast colors, opt for alternative combinations.
Strive for High Quality
Seventh, strive for high quality in your visual aids. While it may seem unfair, nothing undercuts the impact of a carefully prepared speech like a typo in your visual aid. Audience members read such seemingly small errors as marks of carelessness or lack of preparation. Thus you should read and reread your visual aids for spelling or grammatical errors before your presentation.
Similarly, a low-quality image can hurt your credibility. This is especially true when presenting in person. An image needs to be large enough for the people in the back of the room to see, and it should not be blurry or pixelated when projected.
Creating your own visual aid better ensures a high-quality image. In the previous chapter, we explained that making your own visual aid also ensures it is customized to your specific speech’s needs. The final usage principle will add that using your own image avoids copyright concerns.
Follow Copyright and Academic Honesty Rules
Finally, follow copyright and academic honesty rules. It can be difficult to navigate copyright laws, especially when speaking in an educational context. Therefore, we provide guidance both for the images or video clips and for citing them.
Creating or Borrowing Images and Video
To be safe, whenever possible, create your own images (pictures, charts, infographics, etc.) and video (clips, GIFs, etc.).
If it’s not possible to make your own, use images and videos that are legally free to use. These might be called “open access,” “Creative Commons,” “public domain,” “royalty-free,” “free stock,” or simply “free,” and there are many websites devoted to them. Just search for “Creative Commons images” to find several websites. Alternatively, after conducting a Google Images search, find the Google “Tool” that allows you to specify that your results only show images with “Usage Rights” set to “Creative Commons licenses.”
Once again, you should also discover what resources your college or university can make available to you. It is possible your library already subscribes to an image service you can use for free. Otherwise, if an image or video does not explicitly give you permission to use it, assume it is protected by US copyright law.
If you really want to use a copyright-protected image or video and do not have explicit permission to use it, try to obtain permission from the copyright holder. Explain who you are (likely a student), what you want to use (the specific image or video), what you will use it for (likely a class assignment), and who the audience will include (likely your instructor and classmates). This path can be simple if the holder is clearly named, is easy to contact, is quickly responsive to your request, and grants you free access. More typically, however, it is not that easy or fast, which is why creating your own images or finding legally available images or videos is a preferable option.

Fortunately, in some cases, you can legally use copyrighted images or video clips without receiving permission. Fair use is a legal doctrine that allows copyrighted material to be used without explicit permission, based on four factors:
- the purpose and character of use
- the amount or substantiality of use compared with the work as a whole
- the nature of the copyrighted work
- the effect on the potential market for sale or value of the copyrighted material
You must apply these four factors each time you want to use a copyright-protected image or video to assess the applicability of fair use.[2] Your librarian or professor may be able to help you, and your college or university may have a guide to fair use that provides a more detailed explanation.
Citing Images and Video
Whenever you use images or videos you did not fully create by yourself, exercise academic honesty by correctly citing them through written citations. That means abiding by the following advice:
- Follow a style guide (like MLA or APA). They typically have citation guides for artwork, YouTube videos, social media posts, and so on.
- If you used legally free images or videos, follow our advice in chapter 9 to use the TASL method developed by the creators of Creative Commons licenses.
- If you used some form of artificial intelligence (AI) to produce a visual aid, follow our guidance in chapter 9 for citing the use of AI tools: Name the AI tool and version you used as well as the company that makes it, list the date you used the tool and what you used it for, and include a URL to the tool.
- If you used copyrighted material based on the fair use doctrine or with the originator’s permission, you should specify that along with your citation.
You might wonder where you should include written citation information for viewers. Recall our advice in chapter 9 to either create a “credit page” at the end of the slide deck or video or add citations to the visual slides or in the video itself. If you choose the latter, you can use a small font and a low positioning of the citation so it does not compete with the image or video for the audience’s attention. Wherever you decide to offer a written citation of a visual image or video, including the citation builds your credibility by giving credit to the source who created the image or video clip.
Box 29.4 Improving Your Visual Aid Design
After you have created a visual aid, improve it by using the design principles and answering the following questions. Alternatively, apply the principles to a peer’s visual aid to help them improve their design.
|
Design Principle |
Questions to Ask about the Visual Aid |
|
Visual aids should be visual. |
|
|
Less is more. |
|
|
Consider spacing and positioning. |
|
|
Use color strategically. |
|
|
Consider what your visual choices suggest. |
|
|
Consider readability for all audience members. |
|
|
Strive for high quality. |
|
|
Follow copyright and academic honesty rules. |
|
Usage Principles
Once you have designed your visual aids, plan how you will incorporate them into your speech. We offer five usage principles, or advice, to guide you: introduce and explain your visual aids, give the audience time to digest your visual aids, do not be afraid of a blank slide or screen, talk to the audience or camera rather than to your visual aids, and practice with your visual aids.
Introduce and Explain Your Visual Aids
 First, introduce and explain your visual aids. Do not expect your visual aids to speak for themselves or for their connection to your speech to be self-evident. Instead, introduce your slide, video clip, or audience-interactive visual aid by providing a transition and any necessary context or instructions. Then explicitly acknowledge your visual aid and explain what you hope the audience notices or concludes from it.
- If you display a chart, graph, map, or photograph, for instance, point out what you want the audience to visually attend to.
- If you play a video clip, cue the audience for what to look for and/or explain afterward what they should have noticed.
- If you use an audience-interactive visual aid, draw conclusions from the resulting visual aid that the audience’s feedback helped produce.
Give the Audience Time to Digest Your Visual Aids
A second usage principle is to give audiences time to digest your visual aid. It takes people a moment to process a visual aid, even when it’s simple. Consider pausing while they watch or read, and plan that moment into your allotted time. When you talk, speak about the visual aid, which buys your audience more time to focus on it. If you too quickly move to the next point in your speech, the audience’s attention will be split between listening to you and reading your slide, chart, or GIF. They are more likely to pay attention to the visual aid than to you.
Do Not Be Afraid of a Blank Slide or Screen
Third, do not be afraid of a blank slide or screen. Shifting to a blank screen at key points in the speech—for instance, when you want to tell a story—is a great way to refocus attention on you and your ideas. You do not need to show an endless series of images or clips while you speak.
Talk to the Audience or Camera Rather Than to Your Visual Aids
Fourth, talk to the audience or camera rather than to your visual aids. When speaking in person, we recommend the following:
- Don’t turn your back on the audience to face your visual aids projected onto a screen. Keep your body facing your audience even as you glance at your visual aids to talk through them.
- Don’t read from your visual aids! Don’t stare at the slides as if looking for answers. Use your speaking notes instead and make eye contact with the audience if you are able.
When speaking remotely through a screen, we similarly insist on the following:
- Don’t read your notes from your computer or tablet screen nor look only at the visual aids you are sharing on your screen. If your face is visible, it is obvious to viewers that your eyes are looking down, away, or even left and right as you read your notes.
- Instead, look at the camera if you can, or, if appropriate, turn off your camera and just focus viewers’ attention on your visual aids while you discuss them.
Practice with Your Visual Aids
Finally, practice with your visual aids. This is one of the best pieces of advice we can offer. Many presentations could be more powerful if slides, a video clip, or an audience-interactive visual aid were timed better. Practicing your speech with visual aids will help you work out the timing and gain familiarity and confidence using them.
Box 29.5 Improving Your Use of Visual Aids
When incorporating visual aids into your presentation, abide by the following usage principles as you prepare and practice your speech:
- Verbally introduce and explain your visual aids.
- Give the audience time to digest your visual aids.
- Do not be afraid of a blank slide or screen.
- Talk to the audience or camera rather than to your visual aids.
- Practice with your visual aids.
In conclusion, we remind you that visual aids are powerful—and potentially fun—public speaking tools. As you plan and design your visual aids, keep your focus on the ways visual aids can assist and build civic engagement in a well-crafted speech.
Summary
Visual aids offer many advantages to speakers when they are well designed and effectively incorporated into a speech. However, when poorly crafted or mishandled, visual aids can do more harm than good. In this chapter, we established the following:
- Eight basic design principles will help you create visual aids that are thoughtful, strategic, and memorable: Visual aids should be visual, less is more, consider spacing and positioning, use color strategically, consider what your visual choices suggest, strive for high quality, and follow copyright and academic honesty rules.
- Follow five usage principles to incorporate visual aids into your presentation effectively: Introduce and explain your visual aids, give the audience time to digest your visual aids, do not be afraid of a blank slide or screen, talk to the audience or camera rather than to your visual aids, and practice with your visual aids.
Key Terms
alignment
fair use
presented visual element
proximity
suggested visual element
visual contrast
visual harmony
white space
Review Questions
- What are seven principles of design for visual aids?
- Name five principles for using visual aids.
- How can alignment, proximity, visual contrast, visual harmony, and white space improve your visual aid design?
Discussion Questions
- Find an example of a visual aid that you think exhibits excellent design. Show it to your class and discuss with your classmates how it implements design principles.
- What are some of the worst mistakes you have seen speakers make in their visual aid design? What design principle(s) did they violate, and how could they have improved their visual aid?
- How does the use of visual aids affect the credibility of speakers? When do you think the judgments we make about speakers’ visual aids are fair and when are they unfair?
- Sonja K. Foss, “Theory of Visual Rhetoric,” in Handbook of Visual Communication: Theory, Methods, Media, eds. Ken Smith, Sandra Moriarty, Gretchen Barbatsis, and Keith Kenny (Mahwah, NJ: Lawrence Erlbaum Associates, 2005), 141–52. ↵
- “U.S. Copyright Office Fair Use Index,” U.S. Copyright Office, updated February 2025, https://www.copyright.gov/fair-use/, archived at https://perma.cc/L7CD-LP35. ↵
